Minggu, 28 Februari 2010

iPad


All of the built-in apps on iPad were designed from the ground up to take advantage of the large Multi-Touch screen. And they work in any orientation. So you can do things with these apps that you can’t do on any other device.

Safari


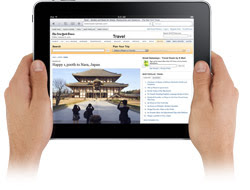
The large Multi-Touch screen on iPad lets you see web pages as they were meant to be seen — one page at a time. With vibrant color and sharp text. So whether you’re looking at a page in portrait or landscape, you can see everything at a size that’s actually readable. And with iPad, navigating the web has never been easier or more intuitive. Because you use the most natural pointing device there is: your finger. Scroll through a page just by flicking your finger up or down on the screen. Or pinch to zoom in or out on a photo. There’s also a thumbnail view that shows all your open pages in a grid, to let you quickly move from one page to the next.


Mail

See and touch your email in ways you never could before. In landscape, you get a split-screen view showing both an opened email and the messages in your inbox. To see the opened email by itself, turn iPad to portrait, and the email automatically rotates and fills the screen. No matter which orientation you use, you can scroll through your mail, compose a new email using the large, onscreen keyboard, or delete messages with nothing more than a tap and a flick. If someone emails you a photo, you can see it right in the message. You can also save the photos in an email directly to the built-in Photos app. And iPad works with all the most popular email providers, including MobileMe, Yahoo! Mail, Gmail, Hotmail, and AOL.


Photos

With its crisp, vibrant display and unique software features, iPad is an extraordinary way to enjoy and share your photos. For example, the Photos app displays the photos in an album as though they were in a stack. Just tap the stack, and the whole album opens up. From there, you can flip through your pictures, zoom in or out, or watch a slideshow. You can even use your iPad as a beautiful digital photo frame while it’s docked or charging. And there are lots of ways to import photos: You can sync them from your computer, download them from an email, or import them directly from your camera using the optional Camera Connection Kit.


Video

The large, high-resolution screen makes iPad perfect for watching any kind of video: from HD movies and TV shows to podcasts and music videos. Switch between widescreen and full screen with a double-tap. Because iPad is essentially one big screen, with no distracting keypad or buttons, you feel completely immersed in whatever you’re watching.


iTunes

A tap of the iTunes icon lets you browse and buy music, TV shows, and podcasts — or buy and rent movies — wirelessly, right from your iPad. Choose from thousands of movies and TV shows (in both standard and high definition), along with thousands of podcasts and millions of songs. Preview songs before you buy them. Or just sync iPad with the content you already have in your iTunes library on your Mac or PC.


App Store

iPad runs almost 140,000 apps from the App Store. Everything from games to business apps and more. And new apps designed specifically for iPad are highlighted, so you can easily find the ones that take full advantage of its features. Just tap the App Store icon on the screen to browse, buy, and download apps wirelessly, right to the iPad.


Maps

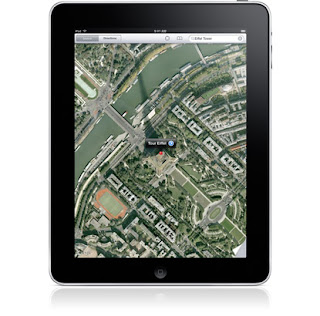
Finding your way is a completely new experience on iPad. Tap to view maps from above with high-resolution satellite imagery, up close with street view, or with topography in a new terrain view — all using Google Services. Search for a nearby restaurant or landmark, then get directions from your current location.

Rabu, 27 Januari 2010

THREE IN ONE OS THE 'MAC'


UsingrEFIt

Installing rEFIt

If you just want to try out rEFIt without affecting your computer, you can burn rEFIt to a CD-R (or CD-RW) and boot from that. The distributed .dmg and .cdr disk images are ready to burn. See the burning instructions for details.

Automatic Installation with the Installer Package

Both disk image distributions (.dmg and .cdr) also contain the new installer package. It will install rEFIt on your Mac OS X installation volume and make sure it is active. This is now the recommended way to install and use rEFIt.

The steps to install rEFIt this way are as follows:

  1. Download and mount the rEFIt-0.13.dmg disk image.
  2. Double-click on the “rEFIt.mpkg” package.
  3. Follow the instructions and select your Mac OS X installation volume as the destination volume for the install.

If everything went well, you’ll see the rEFIt boot menu on the next restart.

Manual Installation on the Mac OS X volume

If you don’t want to use the installer package, you can do a manual install instead. This section explains how to do a manual install to your Mac OS X installation volume, which requires no additional volumes or disks. It is possible to install rEFIt elsewhere; see the following sections for that.

Here are the steps for a manual install:

  1. Download the “Mac disk image” or any of the other two binary distributions from the home page. Double-click to mount or unpack them.
  2. Copy the “efi” folder from the rEFIt distribution to the root level of your Mac OS X volume.
  3. Open Terminal and enter the following commands:
    cd /efi/refit ./enable.sh
    When prompted, enter the password for your user account.

If everything went well, you’ll see the rEFIt boot menu on the next restart.

Note: If you get a message saying “No such file or directory” in the last step, then you didn’t put the “efi” folder in the right place in step 2.

This manual installation method has a drawback that you should be aware of. Since you’re not using rEFItBlesser, Mac OS X updates will disable rEFIt, and the rEFIt menu will show up even when waking from Safe Sleep.

Installing on a separate volume or external disk

If you’re uncomfortable with having rEFIt on your Mac OS X volume, you can install it on any other volume, as long as it is formatted in the HFS+ (“Mac OS Extended”) format. For example, you can install rEFIt on a USB flash drive.

The installation procedure is basically the same as explained above — copy the “efi” folder to the root of the volume, and run “enable.sh” inside the “efi/refit” directory. The path in Terminal will be different, for example “/Volumes/MyStick/efi/refit” if the volume is named “MyStick”.

If you want, you can use the provided “rEFIt.icns” icon as a volume icon.

Installing on the EFI System Partition

It is also possible to install rEFIt on the hidden “EFI System Partition” on your internal disk. This is recommended for advanced users only

EFI mendukung keluarga sistem berkas FAT keluar dari kotak, dan Apple juga termasuk sopir untuk HFS +. Driver tambahan akan sangat berguna, terutama untuk ext2/ext3 dan ISO9660. Kode di GNU grub bisa berfungsi Sebagai titik awal.

Untuk Memuat driver, perlengkapan baru akan diperluas untuk Memuat semua. File efi dalam \ efi \ mereparasi \ drivers direktori secara otomatis.

Disk Partisi

Boot Camp membutuhkan hibrida GPT / MBR, tabel partisi untuk Bekerja dengan baik. alat untuk mereparasi termasuk memperbarui tabel MBR setelah Mengedit tabel GPT, tapi akan jauh lebih baik partisi untuk memiliki alat-alat yang mendukung secara langsung format hibrida. GNU Parted terlihat menjanjikan - itu sudah mendukung GPT, dan memiliki sistem berkas kode Resize untuk sistem file yang paling umum. Beberapa tugas:

* Meningkatkan alat gptsync: deteksi sistem berkas untuk partisi GPT Data Dasar, kekokohan.
* Meningkatkan GNU parted untuk Bekerja dengan baik pada Intel Mac: HFS + little-endian isu, HFS + tipe partisi GPT, GPT hibrida / MBR format.
* Port GNU parted untuk Mac OS X (Terminal dan / atau Cocoa GUI).
* Port GNU parted lingkungan ke EFI. (Hal ini saat ini ditahan dalam mendukung Penyelamatan sistem Linux.)


Kamis, 14 Januari 2010

Viscosity Quick Start Guide


This guide is designed to get you

started using Viscosity in the fastest way possible. If you require more detailed instructions, walkthroughs, or troubleshooting information please refer to the

Viscosity website.


Installing Viscosity

Step 1

Open the Viscosity.dmg file (usually ocated in your Downloads folder) by double-clicking it.


Step 2

Drag Viscosity to your Applications folder.


Step 3

Eject the Viscosity disk image.


Step 4

Launch Viscosity from your

Applications folder.


Step 5

Enter your username and password

so Viscosity can configure itself and

install any necessary components.


Creating Your First VPN Connection

You can create a connection in Viscosity by manually configuring a connection, or by importing a connection from a bundle or OpenVPN configuration file.


Manually Creating A Connection

Step 1

Open Viscosity, go to the Viscosity menu and select “Preferences…”. The preferences window should appear.


Step 2

Make sure the “Connections” toolbar item is selected, and then click the “+” button in the bottom left hand corner of the window. Select “New Connection” from the menu that appears.


Step 3

Give your connection a name, which can be anything you want. In the Address field enter the address of the OpenVPN server. Change the port if the server doesn’t used the default value. Select the protocol and device that matches the OpenVPN server’s settings.


Step 4

Click on the “Certificates” tab. From the Authentication Type menu select the authentication type your

OpenVPN server requires. Different options will be displayed depending on the type. To use multiple authentication types, simply select each type in turn from the menu and configure it. Most fields require you to select a certificate or key file. Your server administrator should have provided you with these if required. To specify a file, click the “Select…” button, locate the file, and click Open.


Step 5

Use the tab bar to configure the remaining sections (Options, Networking, Proxy, and Advanced) as required. In most cases the default settings will work. If your server requires you to enter a username and password to connect, make sure you tick the “Use Username/Password Authentication” checkbox under the Options tab. Click the Save button when finished.


Step 6

Your connection will now appear in the Viscosity menu. To connect, select your connect from the menu. The menu icon will update to let you know when your new connection has connected.


Importing A Connection

You can import a connection into Viscosity by double clicking on a Viscosity connection bundle or OpenVPN configuration file, or by following the steps

below:


Step 1

Open Viscosity, go to the Viscosity menu and select “Preferences…”. The preferences window should appear.


Step 2

Make sure the “Connections” toolbar item is selected, and then click the “+” button in the bottom left hand corner of the window. Select “Import Connection” from the menu that appears.


Step 3

Select the connection bundle (.visc) or OpenVPN configuration file (.ovpn or .conf) supplied by your server administrator. Click the Open button.


Step 4

Your connection will now appear in the Viscosity menu. To connect, select your connect from the menu. The menu icon will update to let you know when your new connection has connected.


The Details Window

The Details window allows you to monitor your VPN connections. If you experience trouble connecting you should first check the details window for information. Make sure you have the correct connection selected in the menu at the top.


Traffic Graph

The traffic graph will graph network traffic for the last 60 seconds. It will automatically scale to match the maximum traffic rate. The vertical axis on the left will list the range of data rates, while the In/Out values list the current data rate of traffic passing through the VPN connection.


Traffic

The traffic section lists total data amounts that have passed through the VPN network adapter. These values are reset each time the connection is reestablished.


Log

The log section displays the OpenVPN log output. The log will contain important information if you are having trouble connecting.

Senin, 11 Januari 2010

CONFIGURATION FILES in TUNNELBLICK

Each tunnel to be opened by Tunnelblick needs an OpenVPN configuration file. Tunnelblick considers any file located in ~/Library/openvpn with an extension of .conf or .ovpn to be a configuration file, and presents each such file as a potential "connection”. (The "~" refers to your home folder.) Often these configuration files will be supplied to you. Refer to the OpenVPN documentation for details about what the configuration file should contain. (Note that some OpenVPN options are available only on Windows.)

When using a "deployed" version of Tunnelblick, configuration files are all located within the Tunnelblick application itself, so ~/Library/openvpn is not used. See the Deploying Tunnelblick wiki for details.

Tunnelblick monitors the folder that contains the configuration files. If a configuration file is added, the new configuration is available immediately without restarting Tunnelblick or disturbing existing connections. If a configuration is removed from the folder, any connection using that configuration is immediately disconnected. To disable this behavior, use "doNotMonitorConfigurationFolder". (See the "Preferences" section.)

The configuration file may also be "shadow" copied to the /Library/Application Support Tunnelblick/Users/username folder. This is done transparently for configuration files located on network volumes. The user should never manipulate this folder or its contents directly; Tunnelblick will do so automatically. (See "useShadowConfigurationFiles" in the "Preferences" section.)

If Tunnelblick's "Set nameserver” option is used:

  • Any "up” or "down” options in the configuration file will be ignored.
  • If any "user” or "group” options appear in the configuration file, DNS settings will not be restored when a tunnel is disconnected.

FILE LOCATIONS

Tunnelblick preferences are contained in ~/Library/Preferences/com.openvpn.tunnelblick.plist. (The "~” indicates your home folder.)

OpenVPN configuration files are stored in ~/Library/openvpn. Usually the key and certificate files are stored there, too. Since these files are all located in the user's Library folder, they must be set up separately for each user.

But note that deployed versions of Tunnelblick contain the configuration file(s), so they do not need to be set up for each user -- any user that can access Tunnelblick.app can connect to VPN.

Shadow" copies of configuration files (if they exist) are located in /Library/Application Support Tunnelblick/Users/username. (See "useShadowConfigurationFiles" in the "Preferences" section.)

See the Deploying Tunnelblick wiki for details of file locations when using a deployed version of Tunnelblick.

Within the Tunnelblick.app application, client up/down scripts and openvpn-down-root.so are located in Tunnelblick.app/Contents/Resources (see the "Set nameserver” checkbox in the "OpenVPN Log Window” section). To access Tunnelblick.app/Contents in the Finder, control-click Tunnelblick.app in the Applications folder, then click on "Show Package Contents”.

When there are no configuration files in ~/Library/openvpn (which is usually the case the first time Tunnelblick is run by each user) when using a non-deployed version of Tunnelblick, the following screen will be displayed:


If you click "Quit”, Tunnelblick will quit without doing anything. If you click "Continue”, Tunnelblick will create and save an example OpenVPN configuration file, ~/Library/openvpn/openvpn.conf, and then open it in TextEdit for you to modify. If you have an OpenVPN configuration file that you are supposed to use, copy its contents, paste them into this file (replacing the default contents), save, and exit TextEdit. Your configuration (named "openvpn.conf”) is all set. Tunnelblick changes the ownership of OpenVPN configuration files to root, so it is protected against unnoticed and possibly malicious changes.

If you have received key files or certificate files together with your personal configuration file, please make sure to put them in ~/Library/openvpn/ (or another location as specified by your network administrator). OpenVPN will try to locate the key files in this folder, unless absolute paths to them are specified in the configuration file.

The first time Tunnelblick is run on a particular computer (but only the first time the first user runs it), it will display the following screen:


Please enter the name and password of a computer administrator. Tunnelblick's imbedded OpenVPN needs root privileges because it needs to modify network settings by configuring new network devices, changing routes, and adding and removing nameservers. Because we don't want you to enter your administrator account name and password every time you start a VPN connection, Tunnelblick comes with a setuid root binary that allows it to do exactly one thing: start a VPN connection with super user rights. Tunnelblick needs your administrator account name password only on its first start after installation, so it can create this setuid root binary.

THE SECOND TIME TUNNELBLICK IS RUN BY EACH USER

The second time Tunnelblick is run by each user, a screen similar to the following will be displayed:

Specify whether or not you wish to have Tunnelblick check for updates. Each time an update is available, you will be given a choice of whether to install the update or not.

WHEN A CONFIGURATION FILE CHANGES

Whenever a configuration file changes, you will need to enter the name and password of a computer administrator. This is done as a security measure: because configuration files can contain references to scripts that run as root, they are owned by root and an administrator must grant permission to use them.

NORMAL TUNNELBLICK OPERATION

Once Tunnelblick has been started, you control it from the icon in the Status Bar at the top of your screen. The Tunnelblick icon is usually placed between the time and the Spotlight icon. When no VPN connection is active, the icon is dark, indicating a closed tunnel:

If you click on the icon, you'll see a drop down menu similar to the following:

There will be a "Connect” menu item for each .ovpn or .conf file in ~/Library/openvpn/. Click on one to establish the corresponding pre-configured VPN connection. To illustrate the connection being established, three dots will appear in the menu item, and the Tunnelblick icon will darken and lighten repeatedly. If the connection is successfully opened, the icon will change to show an open tunnel:

You may be asked for a passphrase or username/password combination if key/certificate files are not being used. You can save your passphrase or password in Apple's Keychain by checking the appropriate checkbox.

The connection will be active as long as you do not end it or log out. Putting your computer to sleep or losing contact with the server (by lack of wlan signal, for example) will make Tunnelblick periodically try to re-establish the connection.

If a connection error occurs, or in the unlikely event of an interface crash, Tunnelblick will terminate the VPN tunnel and record the error in the Console Log.

Use "Disconnect” from the drop-down menu to close the VPN connection. Use "Quit” to close all open connections and quit the program and prevent Tunnelblick from starting itself at your next login at your computer.

If Tunnelblick is running when you logout (or your computer crashes, or is shut down or restarted), then Tunnelblick will be started automatically upon login. To stop Tunnelblick from being started automatically upon login, be sure to quit Tunnelblick before logging out, either by using the "Quit” command, or by using Command-Q (Apple-Q) when the "OpenVPN Log” or "About…” window is active. (Don't confuse this automatic launch of Tunnelblick upon login with the "Automatically connect on launch” option, which causes a connection to be established when Tunnelblick is started.)

THE "OPENVPN LOG” WINDOW

Click on the Tunnelblick icon in the Status Bar at the top of your screen between the time and the Spotlight icon then click on "Details…” to obtain details for all connections (open or closed). A window similar to the following will appear:

There will be a tab for each connection (i.e., each .ovpn or .conf file), whether the connection is open or closed. Each tab contains a pane with the OpenVPN Log for the connection and two checkboxes that provide options for that connection:

When a connection is attempted, the script for "Set nameserver” saves the current DNS settings and removes DNS settings that were set by DHCP (manual DNS settings are not removed). When a connection is disconnected (or if it fails to connect), the scripts restore the saved DNS settings. The scripts do not support the simultaneous use of two or more nameservers for different domains; custom up/down scripts must be used for this purpose.

In addition, the "OpenVPN Log” window contains four buttons:

You may use the standard keyboard shortcuts in the "OpenVPN Log" window: Command-C, Command-X, and Command-V for copy, cut, and paste; and Command-A, Command-M, Command-W, and Command-Q to select all the text in the log that is currently being displayed, minimize the window to the dock, close the window, and quit the program.


dxxtechnology Copyright © 2009 Premium Blogger Dashboard Designed by SAER